 |
| The magic of overdyeing! |
Wednesday, June 29, 2016
Procion dyeing - science or alchemy? The magic of overdyeing
It doesn't matter how many times I do it, moving a pile of yellows, greens and blues to purples, pinks, reds and browns just feels like alchemy, not science! So glad I did Carol Soderlund's color mixing class. Magic is easier to perform when you have a great road map.
Tuesday, June 21, 2016
Ice-dyeing circles
At last! One I like. Color is nicely blended and has intense peaks for interest. Needless to say the chemist photographed this scarf as she headed out the door with it....


Wednesday, June 15, 2016
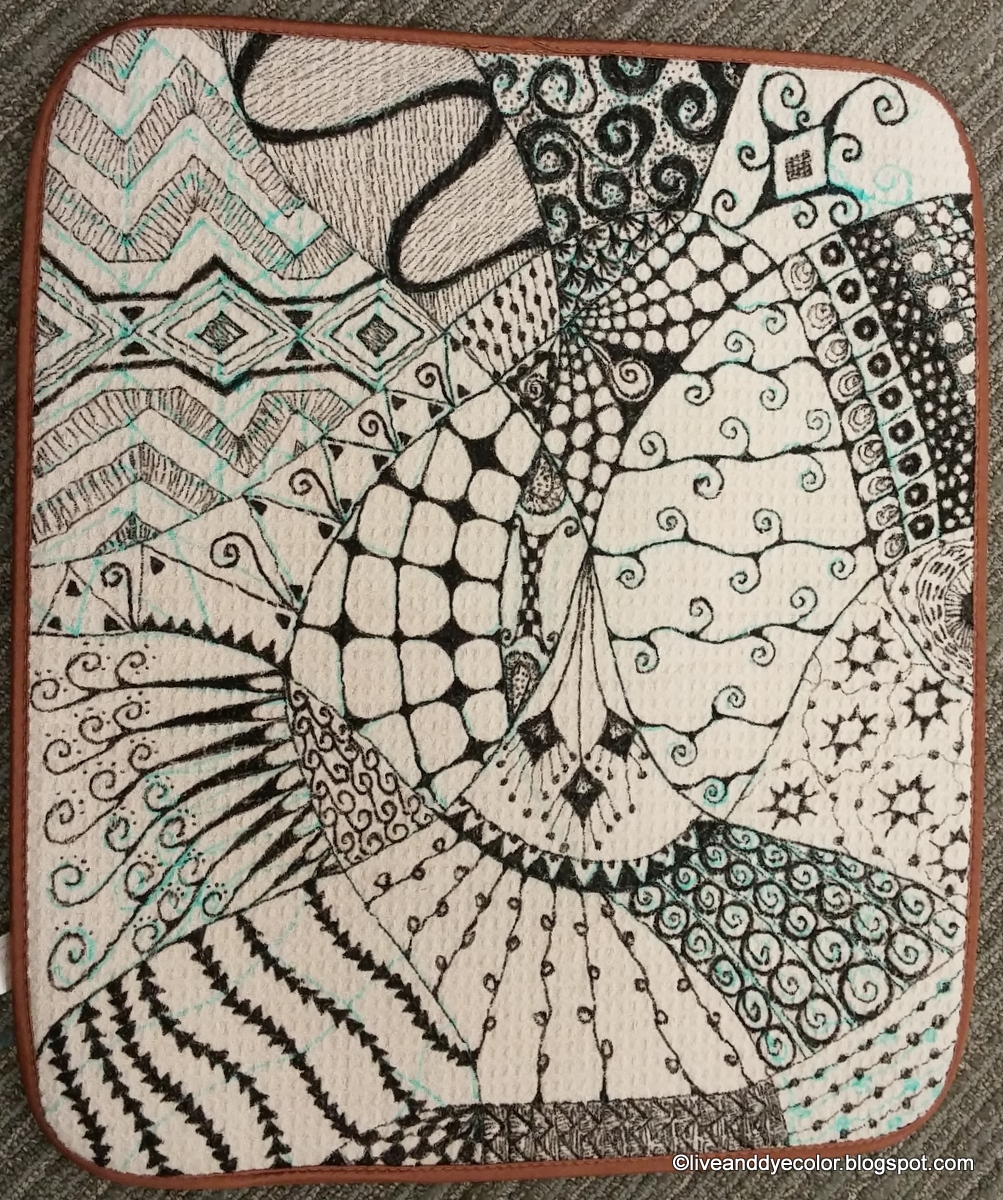
Zentangle and Inktense
I've never zentangled, such a shocking revelation, I know! So when my drying mat got grungy looking - it was beige to start with, so not far to go...

I got out the Pentel gel pens and started making it prettier.

Then out with the Inktense pencils, my newest toy. They were a lot of fun, pretty much colored pencils till you add water. I can see how this adult coloring craze got started. It's very restful coloring a design. No pesky composition choices to make, just play with the colors.

Once I added water the flaw reared it's head as usual. Not only was this a waffle fabric, which had added some kinks to the coloring process, but the mat is designed to be absorbent. It's for dishes to dry on after all. I wafted a brush over the Inkense and not much happened because the water just got sucked into the fabric instead of having time to turn the pencil marks into flowing ink. Eventually I was painting with spoons of water. An interesting technique...eventually I got on enough water to make the lines melt together. I didn't like the strength of color I'd achieved, so turned to the blocks of Intense and adding a little more oomph.

Now I like my drying mat much better. I also have a new batch of scarf blanks because I can't wait to try this on a more receptive fabric type. I think zentangle and Inktense were made for each other and will make funky scarves! Stay tuned!
Sunday, June 5, 2016
Carol Soderlund class: Color mixing for dyers - Mind blown!
I spent the past week in Baltimore, Ohio at the Crow Barn. Fabulous location, wonderful food, great people.
But the class, oh my! I have spent 2 years experimenting with color and trying to find a good system to get a handle on my results. Carol Soderlund's class on color mixing not only reinforced what I have already learned, but also went so much further. She has such a great system for testing color families, and cross referencing the results. We dyed and dyed and dyed again. Working in groups meant we made a huge color "Bible" in just 5 days. This extensive list of all our results, with one inch squares of fabric indexed as reference materials, means that future overdyes, color choices and gradients will all be simplified. I feel as though I was groping in the dark and someone turned the light on! Thanks, Carol! Now maybe I can stop testing and start creating!
This was the first time I had dyed solids. I still love low water immersion, just for the freedom and the wonderful variety of color and texture it creates on the fabric, but I can see myself dyeing solids too now. I can see why people rave about Carol's classes. She is a great teacher, giving you confidence that if you follow her directions you will get where you need to go. There is lots to digest, but at least I have finished sticking down all my little pieces of fabric. If I never see double sided tape again, that will be just fine by me!
Here are some pics of all the lovely colors we made. Phew, I feel exhausted looking at all we achieved in such a short time!
And just in case we got cocky, there was a Nancy Crow master class going on upstairs. So much beautiful work..
 |
| The Crow Barn |
 |
| More cushions and less testing in my future! |
 |
| Day 1 stacks, waiting for more dyeing, ironing, chopping, distributing and sticking. I need a vacation from my vacation... |
 |
| Some of the great colors people dyed |
 |
| Lots of different techniques |
 |
| The light behind this one brings out the differing depths of color |
 |
| This one looks like granite! |
 |
| The shadows would make some fabulous starting points for further work on this cloth! |
Thursday, May 19, 2016
Oops - unintended soda ash resist
Well what have we here?
Step one: decide to dye an unrealistic amount of fabric
Step two: soda soak it all and wring out batches and put in assorted dishpans with good intentions of getting to it "soon"
Step three: after a couple of weeks when the fabric has completely dried out find some time to dye.
What happens, is that the soda ash forms crusts in the folds, and particularly the selvages. This crust doesn't dissolve even if you rewet the fabric. The crust then acts as a resist, stopping the dye from reaching the fabric. You can see how dark some of the dye bath was, but nothing got through the white areas where the soda ash had dried solid.
 |
| Soda ash makes resist at top right |
Tuesday, May 10, 2016
Quilt guild shared project
This past weekend we had a play date for the West Side Art Quilt guild. The idea was to bring a piece of fabric with one thing done to it, and to pass it around until everyone had added something, and then see what resulted.
 This quilt had the piecing as the first thing done by the original owner. I love violet and golds, such a vibrant color combination! I brought my box of fused scraps, but lots of people brought representational items, and even 3D embellishments. Keep an eye on the green, black and white ball, it will appear again. As this one progressed an Asian theme seemed to emerge.
 Completely different! The butterfly was free motion stitched by one of the members who had cunningly prepared various motifs on some iron away interfacing. I need to track this product down, it sounds very useful!
 The shibori suggested wind to people in this one.
 The frog is hilarious! Wasn't it clever of someone to do blanket stitch around the sun? Looks like rays! The tree was added with colored pencils. We decided to avoid wet media for this exercise.
 The problem with this kind of exercise is integrating all the pieces. I think I might remove the tinsel thread in the corner if this were mine. This one looks like a very complicated story is being told.
 I think this one was my favorite. It seemed to be the most integrated. This lady loves skulls and skeletons, so we all played into the theme. See the reversed green and white ball? In this context it reminds me of a radio active warning symbol! I love the diamond shaped leaves too. There were some strings connecting the three skulls on the right to the arm bone, so they looked like balloons. Somewhere along the way the strings fell off. I do hope they get put back, it looked pretty funny! We only had 20 minutes to work on each piece, so workmanship fell through the cracks.
There was another one, but somehow I didn't get a picture.
This one is mine. I put in the 5 turquoise circles. This group is heavily into representational work, so these quickly got conscripted into a formal picture. Someone used pencils on the flowers and berries, they pop nicely! Now I have to figure out how to quilt it before the next meeting.
 It's a real privilege to be part of a group that gets together to have fun like this!


There was another one, but somehow I didn't get a picture.
This one is mine. I put in the 5 turquoise circles. This group is heavily into representational work, so these quickly got conscripted into a formal picture. Someone used pencils on the flowers and berries, they pop nicely! Now I have to figure out how to quilt it before the next meeting.

Wednesday, May 4, 2016
Wednesday Words: New title for studio: The playroom
My sewing room/studio is now officially my playroom. The word "studio" sets up too many expectations. A-R-T has to come out of studios. Not experimentation, and trial and error. I need a space to play. Out of that play it is possible that art may come.
I've been watching this TED talk by Dr. Stuart Brown on the importance of play. I've always known that I needed time alone. I'm an introvert, and one of the best insights anyone ever gave me is that introverts don't not like people. They just find their energy from being alone. Being alone and being fiercely concentrated on a creative project is like crack for me. I actively seek out the experience, and I become cranky when I can't have it.
Per Dr. Brown, play is not just for kids, play is not optional, play is not an activity for when we have nothing else to do. Play is intentional, restorative, and builds our ability to function better in the other aspects of our lives. As my dear friend Margi, a pre-school teacher, once impressed on me: play is actually very serious work.
 While I was thinking about play/work I was doodling a sign for my
 studio playroom door. Once I had the letters on the page I started to free-associate words to decorate the page. I doodled mememememe, and, boy, did that make me uncomfortable. Society has certainly done a number on me. Playtime is only for when all the chores are done, and the chores are never finished. Playtime is selfish. Playtime is self-indulgent. Grown ups have better things to do (such as fall asleep in front of the TV??).
It is going to take time to give myself permission to play unreservedly. I know that play replenishes my spirit and makes me a nicer person to be around when I'm done playing.
You'll find me in the playroom. I'll be coloring my new sign for a start! I'll even share my toys...
I've been watching this TED talk by Dr. Stuart Brown on the importance of play. I've always known that I needed time alone. I'm an introvert, and one of the best insights anyone ever gave me is that introverts don't not like people. They just find their energy from being alone. Being alone and being fiercely concentrated on a creative project is like crack for me. I actively seek out the experience, and I become cranky when I can't have it.
Per Dr. Brown, play is not just for kids, play is not optional, play is not an activity for when we have nothing else to do. Play is intentional, restorative, and builds our ability to function better in the other aspects of our lives. As my dear friend Margi, a pre-school teacher, once impressed on me: play is actually very serious work.

It is going to take time to give myself permission to play unreservedly. I know that play replenishes my spirit and makes me a nicer person to be around when I'm done playing.
You'll find me in the playroom. I'll be coloring my new sign for a start! I'll even share my toys...
Subscribe to:
Posts (Atom)