 |
| Extreme overdyeing - not yet an Olympic sport... |
Sunday, August 21, 2016
Extreme overdyeing
2 reds, 2 yellows, 4 blues, about 30 yards of fabric, dyeing, preparing for dyeing, labeling, panicking and triple checking. Ready for the final overdyes. This has been a major project! Looking forward to some pretty colors and good reference charts.
Friday, July 29, 2016
Dyeing families
After taking Carol Soderlund's excellent class on color families, I embarked on an ambitious (aka crazy) project to dye 8 color families. Here's a preview of the chaos. Note the stink eye from Ms. Twitch, who feels very neglected.


Monday, July 11, 2016
Pentel gel pens, inktense and dynaflow - precision, color, POP!
Too much fun with Pentel gel pens. I love the precision they allow.

Not the best choice for a scarf as they only really show up on one side. Will be great for some other applications though.

Then beavering away with the Inktense pencils. I wasn't crazy about all the coloring lines that resulted, so out with the Inktense blocks and much mixing, rubbing and blending and it's more to my liking.

I think I will use the blocks more in future, but the pencils are great for detail. Once I got to the background it seemed much too expensive to use the Inktense so out with the Dynaflow and salt.

How I wish Procion dyes could replicate this effect! But once the Dynaflow started its old abrading tricks I remembered why I switched to Procion.

The abrasion marks work with the antique look of the scarf, luckily.
 Designs loosely based on Jacobean embroidery.

Not the best choice for a scarf as they only really show up on one side. Will be great for some other applications though.

Then beavering away with the Inktense pencils. I wasn't crazy about all the coloring lines that resulted, so out with the Inktense blocks and much mixing, rubbing and blending and it's more to my liking.

I think I will use the blocks more in future, but the pencils are great for detail. Once I got to the background it seemed much too expensive to use the Inktense so out with the Dynaflow and salt.

How I wish Procion dyes could replicate this effect! But once the Dynaflow started its old abrading tricks I remembered why I switched to Procion.

The abrasion marks work with the antique look of the scarf, luckily.

Wednesday, June 29, 2016
Procion dyeing - science or alchemy? The magic of overdyeing
It doesn't matter how many times I do it, moving a pile of yellows, greens and blues to purples, pinks, reds and browns just feels like alchemy, not science! So glad I did Carol Soderlund's color mixing class. Magic is easier to perform when you have a great road map.
 |
| The magic of overdyeing! |
Tuesday, June 21, 2016
Ice-dyeing circles
At last! One I like. Color is nicely blended and has intense peaks for interest. Needless to say the chemist photographed this scarf as she headed out the door with it....


Wednesday, June 15, 2016
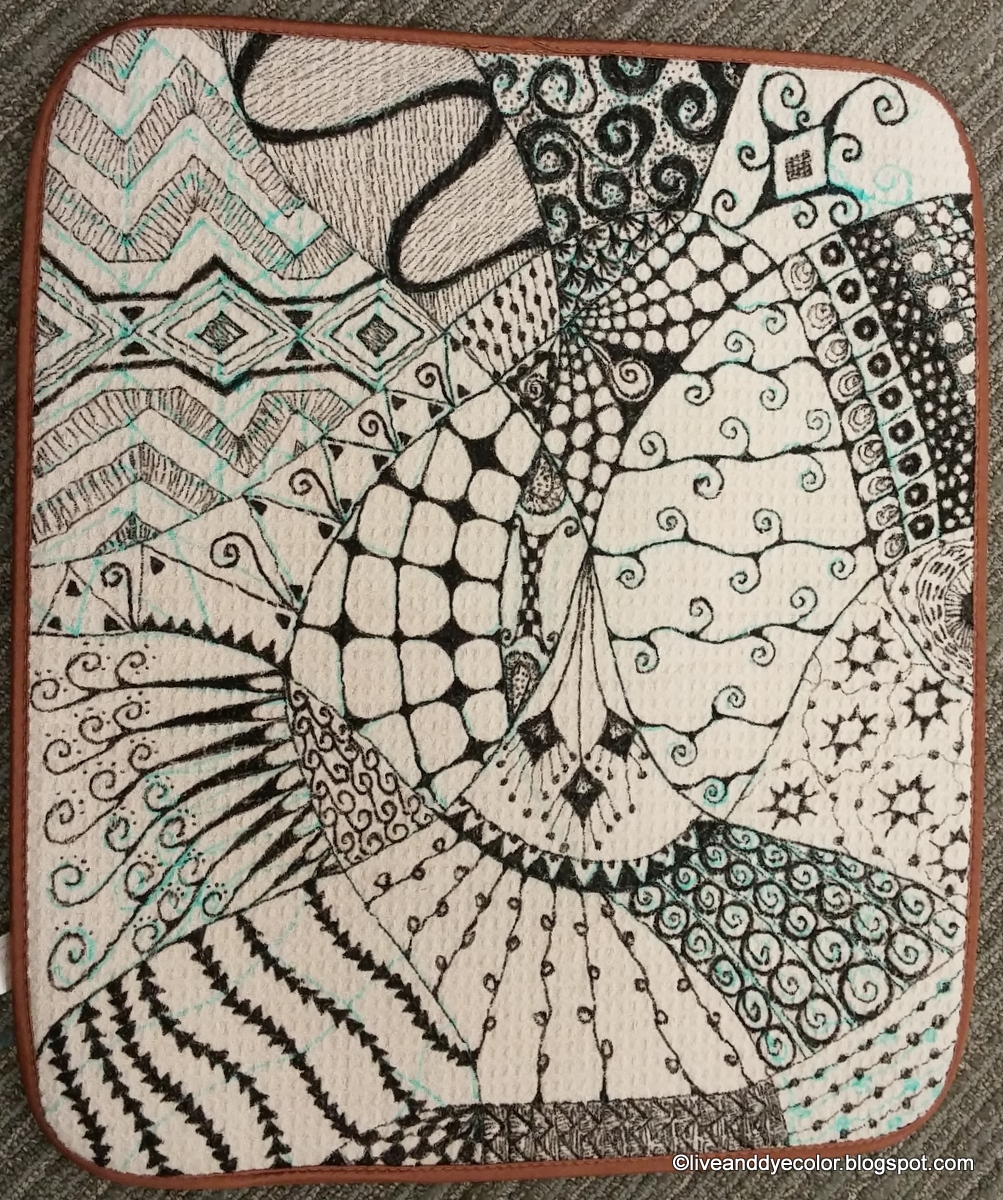
Zentangle and Inktense
I've never zentangled, such a shocking revelation, I know! So when my drying mat got grungy looking - it was beige to start with, so not far to go...

I got out the Pentel gel pens and started making it prettier.

Then out with the Inktense pencils, my newest toy. They were a lot of fun, pretty much colored pencils till you add water. I can see how this adult coloring craze got started. It's very restful coloring a design. No pesky composition choices to make, just play with the colors.

Once I added water the flaw reared it's head as usual. Not only was this a waffle fabric, which had added some kinks to the coloring process, but the mat is designed to be absorbent. It's for dishes to dry on after all. I wafted a brush over the Inkense and not much happened because the water just got sucked into the fabric instead of having time to turn the pencil marks into flowing ink. Eventually I was painting with spoons of water. An interesting technique...eventually I got on enough water to make the lines melt together. I didn't like the strength of color I'd achieved, so turned to the blocks of Intense and adding a little more oomph.

Now I like my drying mat much better. I also have a new batch of scarf blanks because I can't wait to try this on a more receptive fabric type. I think zentangle and Inktense were made for each other and will make funky scarves! Stay tuned!
Sunday, June 5, 2016
Carol Soderlund class: Color mixing for dyers - Mind blown!
I spent the past week in Baltimore, Ohio at the Crow Barn. Fabulous location, wonderful food, great people.
But the class, oh my! I have spent 2 years experimenting with color and trying to find a good system to get a handle on my results. Carol Soderlund's class on color mixing not only reinforced what I have already learned, but also went so much further. She has such a great system for testing color families, and cross referencing the results. We dyed and dyed and dyed again. Working in groups meant we made a huge color "Bible" in just 5 days. This extensive list of all our results, with one inch squares of fabric indexed as reference materials, means that future overdyes, color choices and gradients will all be simplified. I feel as though I was groping in the dark and someone turned the light on! Thanks, Carol! Now maybe I can stop testing and start creating!
This was the first time I had dyed solids. I still love low water immersion, just for the freedom and the wonderful variety of color and texture it creates on the fabric, but I can see myself dyeing solids too now. I can see why people rave about Carol's classes. She is a great teacher, giving you confidence that if you follow her directions you will get where you need to go. There is lots to digest, but at least I have finished sticking down all my little pieces of fabric. If I never see double sided tape again, that will be just fine by me!
Here are some pics of all the lovely colors we made. Phew, I feel exhausted looking at all we achieved in such a short time!
And just in case we got cocky, there was a Nancy Crow master class going on upstairs. So much beautiful work..
 |
| The Crow Barn |
 |
| More cushions and less testing in my future! |
 |
| Day 1 stacks, waiting for more dyeing, ironing, chopping, distributing and sticking. I need a vacation from my vacation... |
 |
| Some of the great colors people dyed |
 |
| Lots of different techniques |
 |
| The light behind this one brings out the differing depths of color |
 |
| This one looks like granite! |
 |
| The shadows would make some fabulous starting points for further work on this cloth! |
Thursday, May 19, 2016
Oops - unintended soda ash resist
Well what have we here?
Step one: decide to dye an unrealistic amount of fabric
Step two: soda soak it all and wring out batches and put in assorted dishpans with good intentions of getting to it "soon"
Step three: after a couple of weeks when the fabric has completely dried out find some time to dye.
What happens, is that the soda ash forms crusts in the folds, and particularly the selvages. This crust doesn't dissolve even if you rewet the fabric. The crust then acts as a resist, stopping the dye from reaching the fabric. You can see how dark some of the dye bath was, but nothing got through the white areas where the soda ash had dried solid.
 |
| Soda ash makes resist at top right |
Tuesday, May 10, 2016
Quilt guild shared project
This past weekend we had a play date for the West Side Art Quilt guild. The idea was to bring a piece of fabric with one thing done to it, and to pass it around until everyone had added something, and then see what resulted.
 This quilt had the piecing as the first thing done by the original owner. I love violet and golds, such a vibrant color combination! I brought my box of fused scraps, but lots of people brought representational items, and even 3D embellishments. Keep an eye on the green, black and white ball, it will appear again. As this one progressed an Asian theme seemed to emerge.
 Completely different! The butterfly was free motion stitched by one of the members who had cunningly prepared various motifs on some iron away interfacing. I need to track this product down, it sounds very useful!
 The shibori suggested wind to people in this one.
 The frog is hilarious! Wasn't it clever of someone to do blanket stitch around the sun? Looks like rays! The tree was added with colored pencils. We decided to avoid wet media for this exercise.
 The problem with this kind of exercise is integrating all the pieces. I think I might remove the tinsel thread in the corner if this were mine. This one looks like a very complicated story is being told.
 I think this one was my favorite. It seemed to be the most integrated. This lady loves skulls and skeletons, so we all played into the theme. See the reversed green and white ball? In this context it reminds me of a radio active warning symbol! I love the diamond shaped leaves too. There were some strings connecting the three skulls on the right to the arm bone, so they looked like balloons. Somewhere along the way the strings fell off. I do hope they get put back, it looked pretty funny! We only had 20 minutes to work on each piece, so workmanship fell through the cracks.
There was another one, but somehow I didn't get a picture.
This one is mine. I put in the 5 turquoise circles. This group is heavily into representational work, so these quickly got conscripted into a formal picture. Someone used pencils on the flowers and berries, they pop nicely! Now I have to figure out how to quilt it before the next meeting.
 It's a real privilege to be part of a group that gets together to have fun like this!


There was another one, but somehow I didn't get a picture.
This one is mine. I put in the 5 turquoise circles. This group is heavily into representational work, so these quickly got conscripted into a formal picture. Someone used pencils on the flowers and berries, they pop nicely! Now I have to figure out how to quilt it before the next meeting.

Wednesday, May 4, 2016
Wednesday Words: New title for studio: The playroom
My sewing room/studio is now officially my playroom. The word "studio" sets up too many expectations. A-R-T has to come out of studios. Not experimentation, and trial and error. I need a space to play. Out of that play it is possible that art may come.
I've been watching this TED talk by Dr. Stuart Brown on the importance of play. I've always known that I needed time alone. I'm an introvert, and one of the best insights anyone ever gave me is that introverts don't not like people. They just find their energy from being alone. Being alone and being fiercely concentrated on a creative project is like crack for me. I actively seek out the experience, and I become cranky when I can't have it.
Per Dr. Brown, play is not just for kids, play is not optional, play is not an activity for when we have nothing else to do. Play is intentional, restorative, and builds our ability to function better in the other aspects of our lives. As my dear friend Margi, a pre-school teacher, once impressed on me: play is actually very serious work.
 While I was thinking about play/work I was doodling a sign for my
 studio playroom door. Once I had the letters on the page I started to free-associate words to decorate the page. I doodled mememememe, and, boy, did that make me uncomfortable. Society has certainly done a number on me. Playtime is only for when all the chores are done, and the chores are never finished. Playtime is selfish. Playtime is self-indulgent. Grown ups have better things to do (such as fall asleep in front of the TV??).
It is going to take time to give myself permission to play unreservedly. I know that play replenishes my spirit and makes me a nicer person to be around when I'm done playing.
You'll find me in the playroom. I'll be coloring my new sign for a start! I'll even share my toys...
I've been watching this TED talk by Dr. Stuart Brown on the importance of play. I've always known that I needed time alone. I'm an introvert, and one of the best insights anyone ever gave me is that introverts don't not like people. They just find their energy from being alone. Being alone and being fiercely concentrated on a creative project is like crack for me. I actively seek out the experience, and I become cranky when I can't have it.
Per Dr. Brown, play is not just for kids, play is not optional, play is not an activity for when we have nothing else to do. Play is intentional, restorative, and builds our ability to function better in the other aspects of our lives. As my dear friend Margi, a pre-school teacher, once impressed on me: play is actually very serious work.

It is going to take time to give myself permission to play unreservedly. I know that play replenishes my spirit and makes me a nicer person to be around when I'm done playing.
You'll find me in the playroom. I'll be coloring my new sign for a start! I'll even share my toys...
Monday, May 2, 2016
Pale doesn't necessarily mean boring - more Procion MX experiments
I have been doing Susan Purney Mark's class Shifting into Neutral. This is radical stuff for a color freak, but there's a place for gentler colors where texture really comes into its own. I'm very much liking the color play across this one. For me the trick is to get light areas that aren't just white cloth. It's a fine line!
 |
| Neutral experiments |
Wednesday, April 27, 2016
Dyeing a gradient with Procion MX
Lots of dyeing = little blogging!
The chemist has been tie/ice-dyeing her heart out. So nice when you can go home and leave the washout to someone else..On the other hand it is wonderful to mix dyes and have someone to hand you clean utensils all the time! She took all the pics on her phone, so I will have tobrowbeat ask her to do a guest post some time. It is so interesting the difference between us. She is all about the folds and I am all about the color!
Here is a gradient I dyed with lemon yellow and grape, both pure colors. It is magical to see how the ambers and browns emerge in the middle of the range. None of these are colors I particularly want to reproduce, but is was good to see what happens.
To dye a gradient figure out how much total dye you will use for each piece of fabric, based on the weight of the fabric. See Paula Burch's invaluable site for information. For convenience let's say 60ml total. Determine how many steps you want in your gradient. Divide 60ml in half, 30ml, and that's your midpoint where you are adding equal quantities of each color. Parse out the rest of the graduations based on how big a color step you want. You also now have a recipe for each step.
If you liked any one of these colors, but didn't like the range, you could now try adding black or water to the recipe for the color you liked to make tints and shades. I like to use a bigger gradient normally, as I am interested in where the color starts to change. Sometimes it takes several steps, but with some of the stronger colors even a touch of the second color pushes the first color in a whole new direction. Infinite possibilites, so little time! Of course when making a shade with black, the black you use will influence the color. There is a good exploration of the undertone of blacks here.
Here is an example of a ratio creating a 7 step gradient, with 5 mixed and 2 pure samples.L is lemon yellow and G is pure Grape. Each time you are changing the ratio by 10ml or 1/6.
60L
50L:10G
40L:20G
30L:30G
20L:40G
10L:50G
60G
The chemist has been tie/ice-dyeing her heart out. So nice when you can go home and leave the washout to someone else..On the other hand it is wonderful to mix dyes and have someone to hand you clean utensils all the time! She took all the pics on her phone, so I will have to
 |
| Lemon//Grape gradient |
To dye a gradient figure out how much total dye you will use for each piece of fabric, based on the weight of the fabric. See Paula Burch's invaluable site for information. For convenience let's say 60ml total. Determine how many steps you want in your gradient. Divide 60ml in half, 30ml, and that's your midpoint where you are adding equal quantities of each color. Parse out the rest of the graduations based on how big a color step you want. You also now have a recipe for each step.
If you liked any one of these colors, but didn't like the range, you could now try adding black or water to the recipe for the color you liked to make tints and shades. I like to use a bigger gradient normally, as I am interested in where the color starts to change. Sometimes it takes several steps, but with some of the stronger colors even a touch of the second color pushes the first color in a whole new direction. Infinite possibilites, so little time! Of course when making a shade with black, the black you use will influence the color. There is a good exploration of the undertone of blacks here.
Here is an example of a ratio creating a 7 step gradient, with 5 mixed and 2 pure samples.L is lemon yellow and G is pure Grape. Each time you are changing the ratio by 10ml or 1/6.
60L
50L:10G
40L:20G
30L:30G
20L:40G
10L:50G
60G
Tuesday, April 5, 2016
Dyeing thread or yarn with Procion MX dye
Here's how I dye yarn for couching.
On a piece of shelf liner (Bed, Bath and Beyond has the widest I've found so far) put separate patches of dyes in the colors you wish to use. My stash is short on blues, so that's what I'm dyeing here.
Remember how we organized the yarn so it wouldn't be a tangled mess after dyeing? You can see the synthetic wool I used for tying. It will not take the dye and will make it easy to untie the bundle after dyeing. The yarn is already soda soaked. In fact it is dripping wet. I find that soda saturated fiber takes the dye best. If it is dry it will take a great deal of dye to get good coverage.
Now I take my gloved hands and mix and mingle the dye as desired to make the colors I want in the yarn. I prefer to work with small amounts of dye and add more as needed, since the soda ash from the fiber is going to be all over the work surface. This will contaminate the dye, so I don't want to put any dye back into my dyestock as the soda ash will start reacting with the dye stock. What's on the shelf liner stays on the shelf liner! Once I have the colors I want, it's batch and wash as normal. I tend to handwash the yarn as I don't want felting, and since I use it for couching it's ok if it's not as colorfast as the standard I hold my fabric to. Commercially dyed variegated yarns and threads tend to shoot for a one inch change in tone/color, so I aim for that too. Ish.
On a piece of shelf liner (Bed, Bath and Beyond has the widest I've found so far) put separate patches of dyes in the colors you wish to use. My stash is short on blues, so that's what I'm dyeing here.
 |
| Preparing to dye yarn |
Now I take my gloved hands and mix and mingle the dye as desired to make the colors I want in the yarn. I prefer to work with small amounts of dye and add more as needed, since the soda ash from the fiber is going to be all over the work surface. This will contaminate the dye, so I don't want to put any dye back into my dyestock as the soda ash will start reacting with the dye stock. What's on the shelf liner stays on the shelf liner! Once I have the colors I want, it's batch and wash as normal. I tend to handwash the yarn as I don't want felting, and since I use it for couching it's ok if it's not as colorfast as the standard I hold my fabric to. Commercially dyed variegated yarns and threads tend to shoot for a one inch change in tone/color, so I aim for that too. Ish.
 |
| Yarn dyed by pulling the colors together from pools of dye concentrate |
Monday, March 14, 2016
Dyeing mercerized fabric - worth it
Sometimes I buy JoAnn Fabrics muslin to dye, mainly because it's cheap and they have amazing coupons. But if you look at the difference below, you have to ask if cheap is really worth the price.
 The mercerized fabric on the left has taken the same dye recipe so much more vibrantly and with so much more texture.
The mercerization process is pretty brutal for the poor fabric. It is given a bath in caustic soda, which causes the fibers to swell, increasing the surface area, and thus enabling them to accept more dye. Mercerization also makes the fabric stronger, gives it added luster, and makes it pre-shrunk to some limited extent (Of course this process also leaves a nasty chemical mess to be disposed of).

The mercerization process is pretty brutal for the poor fabric. It is given a bath in caustic soda, which causes the fibers to swell, increasing the surface area, and thus enabling them to accept more dye. Mercerization also makes the fabric stronger, gives it added luster, and makes it pre-shrunk to some limited extent (Of course this process also leaves a nasty chemical mess to be disposed of).
Thursday, March 10, 2016
Fabric pots for putting things in - super easy!
A favorite Winnie-the-Pooh story in my house is the one where Pooh discovers that it is Eeyore's birthday and no one is celebrating. Pooh and Piglet rush around and find him presents, but Pooh absentmindedly eats the present of honey on the way, and Piglet falls down and pops the balloon he was bringing Eeyore. When presented with an empty pot and a tattered balloon, Eeyore finds he has both a pot for putting things in, and something to put in it, and is uncharacteristically happy! There is something very satisfying about a pot for putting things in.

The chemist and her dad are off to South Africa, and I am resisting the urge to fill their suitcases with presents to take. I saw this awesome tutorial for making a fabric pot for putting things in, and am busy making some. They will be unfussy travellers, and light to boot, so perfect. They are pretty quick to make, depending on how much stitching you add. You cut and sew 2 squares and fusible batting, which I finished with hand-dyed thread, fold, sew the 4 seams, hand stitch the pockets and you are done!
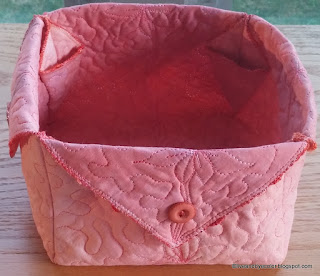 You can make the pot as subtle or as wild as you like!
 And I chose to make each button decoration different.
 See the light shining through the needle holes? Couldn't have got that shot if I was trying!
It was fun to play with the Sweet Sixteen again, it's been a while. It made doing all the free-motion stitching a doddle.


If you widen the base size, then increase the size of the triangle seam or you end up with a very floppy end result as there is no peltex or timtex in this pot or bowl or box or whatever you want to call it.

The chemist and her dad are off to South Africa, and I am resisting the urge to fill their suitcases with presents to take. I saw this awesome tutorial for making a fabric pot for putting things in, and am busy making some. They will be unfussy travellers, and light to boot, so perfect. They are pretty quick to make, depending on how much stitching you add. You cut and sew 2 squares and fusible batting, which I finished with hand-dyed thread, fold, sew the 4 seams, hand stitch the pockets and you are done!


It was fun to play with the Sweet Sixteen again, it's been a while. It made doing all the free-motion stitching a doddle.


If you widen the base size, then increase the size of the triangle seam or you end up with a very floppy end result as there is no peltex or timtex in this pot or bowl or box or whatever you want to call it.
Monday, March 7, 2016
What not to ask someone to take on an aeroplane for you, or no, I cannot take your canary's ashes to be interred in the land of its fathers...
The chemist is traveling to South Africa on Thursday. I was there in November. Most of our family is there. Suitcases bulge with presents. It made me ponder some points about the etiquette of asking if someone could take an item with them on a journey. Most people understand that it is hard to be separated from one's near and dear, and the chance to send them something to let them know you are thinking of them and missing them is rare and special. Most people are only too happy to do someone a favor. Unfortuately, sometimes ignorance or a lack of common sense leaves the traveler feeling abused, and less willing to be helpful in the future.
In the interests of fostering happy travels I offer the following musings:
If you want to send an item with the traveler it should be
LIGHT
COMPACT
UNBREAKABLE
UNOOZEABLE
UNWRAPPED
ABLE TO BE JETTISONED WITHOUT GUILT
ABLE TO BE DELIVERED EASILY
1. Space, space, space. If you don't travel a lot you may not think like a seasoned traveler. An international travel allowance is around 20 - 23 kg or 40 - 50 lbs. For a 2 week trip, this can get used up surprisingly fast. Someone once gave me around 15 kg of used children's clothing to give to someone in South Africa. I am not a charity. I am a traveler. I have my own luggage which I need to transport. If you wish to send a lot of things, or something very bulky, feel free to use FedEx.
2. Security. No one wants to end up in a small room with a man putting on a rubber glove in a meaningful way. Airlines have virtually no sense of humor about items which may constitute a threat. Anything you send needs to be unwrapped. However much you would like to cover your gift in ribbons and bows, the person who is transporting it needs to face stern TSA personnel and swear that they are familiar with everything in their luggage. Educate yourself as to what cannot be safely transported and don't send it!
3. Self-contained. No one wants their clothes to smell like your item, be covered in your item, or be colored by your item. Do not send those cinnamon pine cones, the scent of which penetrates your very skull. No Tennessee fire water. No home made jelly. If there is the slightest chance your item may cause issues, wrap it very well in clear plastic.
4. Delivery. The onus on making sure the item reaches its end goal is on you. Do not expect someone else to spend their vacation trying to connect with total strangers to deliver your gift.
5. Make it clear that should the item be lost or damaged, or should it prove impossible to deliver the item, you give full permission for it to be donated to someone else, or put in the trash with no hard feelings at all. Do not ask someone else to transport a priceless family heirloom.
6. Timing. Let the traveler know well in advance that you would be delighted if they would be kind enough to donate a corner of their luggage to you. Do not pitch up the night before they leave and begin showering them with items to fit in. Do not see them off at the airport and expect them to start squeezing things in for you.
All of these points also apply to people who are going home after a trip. It is terribly kind of you to want to give me a gift, but mainly I am delighted to see you, and would rather have a drink with you than be given a bottle of wine to take home.
Kudos to my extended family who give some of the most thoughtful small, light presents ever! Your compassion and ingenuity is much appreciated!
Monday, February 29, 2016
Dye color chips - storing a record of dye experiments
Don't you hate it when you have a brilliant idea that turns out to be a dud? One of my new year's resolutions was to have less trash leaving the house. Consequently, when I wanted to create "paint chips" from my dye samples, I turned to my ample supply of trash cardboard. Political adverts on good card stock, the cardboard sheets that separate cat food cans, etc. etc. I had cardboard in spades. I spent an afternoon carving it up into usable 2" squares, neatly shaving off a piece of my finger in the process. Apparently scalpel means sharp.
I wound about 40 fabric swatches before the father of the artist reminded me that the artist would strongly disapprove of this project on the basis of acid in the cardboard which would discolor the fabric over time. I suggested that next time he might say something sooner...My recycling project lay in ruins. Then I remembered that I had some 50 sheets of stiff vinyl I bought to make stencils with my Cameo. That endeavor ended in a lot of bad language and leftover vinyl. Recycling back on!
There are lots of pictures of people online who make wonderful color sample books, gluing intricate little squares into clean, white pages. I'm pretty sure that if I tried that it would look like a glue factory had exploded across Pigpen's sketch book. Plus I like to play with my color swatches, I don't want them nailed down. Also, when you do low water immersion dyeing, the range of color across the sample can be quite dramatic. If you are were going to pick a little square to represent the dye experiment below, then which little square would you choose? For me it makes more sense to be able to see the range of color across the fabric.

Previously I pinned my samples onto poster board that had been covered with batting. I lost the feeling in the tip of my finger for about a week after all that pin pushing. The problem was the poster boards took up a lot of space, and the cats took great delight in pulling the samples off. Also, the batting deposited gobs of fluff on the samples.
New plan: roll the strips around vinyl (which is awful for the environment, I know, but this was already bought and paid for, so might as well use it, right?) and secure with tape. There may be some discoloration around the tape over time, but it will be very limited. Also, no more pin holes

These dye chips can now be stored in a much smaller space. I can pull them out and play with them as 2" chips, or I can open them up and see the full range of color across the sample. The "recipe" is written in indelible ink on plain muslin, fused to the top of each sample, and cross-referenced in an Excel spreadsheet in case I drop the sample into a different color...true story....Each sample also has a unique number on it, so I can easily put them back in the drawers when I am done playing. The chemist and I spent several days sorting the colors. It was quite satisfying once, and would make me crazy to ever have to do it again. Colors I particularly liked are named and easily identifiable with a large paper clip. Not as pretty as those sample books, but more suited to my way of working.
And the cats do not have opposable thumbs so they won't be able to get into the closed drawers. The day cats evolve opposable thumbs will be a bad day for human kind, and quilter/dyers in particular!
I wound about 40 fabric swatches before the father of the artist reminded me that the artist would strongly disapprove of this project on the basis of acid in the cardboard which would discolor the fabric over time. I suggested that next time he might say something sooner...My recycling project lay in ruins. Then I remembered that I had some 50 sheets of stiff vinyl I bought to make stencils with my Cameo. That endeavor ended in a lot of bad language and leftover vinyl. Recycling back on!
 |
| "Paint chip" MX dye samples - fluff from batting |

Previously I pinned my samples onto poster board that had been covered with batting. I lost the feeling in the tip of my finger for about a week after all that pin pushing. The problem was the poster boards took up a lot of space, and the cats took great delight in pulling the samples off. Also, the batting deposited gobs of fluff on the samples.
New plan: roll the strips around vinyl (which is awful for the environment, I know, but this was already bought and paid for, so might as well use it, right?) and secure with tape. There may be some discoloration around the tape over time, but it will be very limited. Also, no more pin holes

These dye chips can now be stored in a much smaller space. I can pull them out and play with them as 2" chips, or I can open them up and see the full range of color across the sample. The "recipe" is written in indelible ink on plain muslin, fused to the top of each sample, and cross-referenced in an Excel spreadsheet in case I drop the sample into a different color...true story....Each sample also has a unique number on it, so I can easily put them back in the drawers when I am done playing. The chemist and I spent several days sorting the colors. It was quite satisfying once, and would make me crazy to ever have to do it again. Colors I particularly liked are named and easily identifiable with a large paper clip. Not as pretty as those sample books, but more suited to my way of working.
 |
| Some 2000 samples now fit into 4 drawers |
Sunday, February 14, 2016
Chocolate scented gloves
Who in the world thought up that one???
I was looking for some rubber gloves. It upsets me no end the number of plastic gloves I go through when dyeing. I found some at Marshalls. I love Marshalls. It's like a lucky dip every time. These are shocking pink Casabella long gloves. Perfect for washing out fabric. I will probably always use the thin plastic gloves for manipulation, just because they give you so much more control.

I was happily wearing the new rubber gloves, feeling like an environmental champion, when I became aware of the smell of chocolate. Cheap chocolate, not Lindt.I was in the basement. I am very picky about not eating or drinking around my dyeing area. I decided I was losing my mind (again). Eventually I figured out it was the gloves. This smell just doesn't come out. The gloves spend their lives in water, and soda ash. They still stink like poor quality chocolate.
Can't you just imagine some fresh-faced little intern in the product development meeting? How can we make our gloves more marketable? People don't like washing up and cleaning. How, oh how, can we make people love us? The intern puts up a trembling hand and suggests that since everyone loves chocolate, if we make the gloves smell like chocolate then everyone will love the gloves? Reason and logic fly out the window, the intern is promoted, some poor chemist is tasked with impregnating rubber with chocolate scent, and voila!
And now I live in hope that the smell will leave someday soon....
Monday, February 8, 2016
A yarn about wool
Ms. Twitch is a rare and very special personage. She is a rescue who had a tragic childhood. She allows only me to pet her. She hisses and even bites at any other hand, and isn't above giving even me a nip when she's had enough love for the day. She also adores to mouth things. Socks go missing. The Chemist was sewing a skirt when suddenly a vital piece went awol. I have a quilt which I could finish except that the top border has mysteriously vanished. But the thing Ms. Twitch loves most is a ball of wool. She gets a look of complete bliss on her face when her fangs are securely dug into a fuzzy ball.
I have wool. I have a lot of wool. I used to be a knitter. My chiropractor put a stop to that, but I still have boxes of wool. I donated a lot, and only kept the more interesting kinds that I could couch, but I still have 7 banker boxes of wool. I feel very sentimental about those boxes. They have traveled half way around the world with me. However, somewhere along the way they lost their lids.
As you may recall, the basement boys finished the basement themselves. I requested lots of closets, which looked great on the plan. When the framing began there was a certain amount of complaining and attempts at renegotiation, but I held firm. However, when it came to putting ceilings in the closets, it became clear that the camels' backs were seriously one straw short of snapping, and, having learned to pick my battles, I did not push the issue. Also, I had moved into those closets literally before the hinges had been put on the doors!
The result is that if you are small and flexible, and not afraid of heights, you can climb into the ceiling in the basement boys' unfinished side, and walk through the ceiling to those intoxicating boxes of wool at the top of the closet, making scary noises, and even dislodging a light fixture on occasion.
Those balls of wool, which are just asking to be nosed, and mouthed, and toothed, and loved to death, or at least destruction. You can then pick one up in your mouth and make your way back to the floor and make an unholy mess of all that yarn.
Sadly, that fun is over now. After retrieving 6 balls in one week, and finding more lodged where I can't reach them, and two dangling from the rafters, I finally gave up on my cardboard boxes and bought some plastic boxes with lids.
I like them because they are clear and I can see what's inside, but I'm afraid that for Ms. Twitch, that is just added torture. She can see the prize, but is no longer able to savor the fluffy delights.Thank goodness for her lack of opposable thumbs.

 |
| You malign me, I have no interest in that silly wool |
 |
| No interest at all |
 |
| Ok, I lied, but I am lying on the wool, therefore it no longer exists as far as you are concerned. |
 |
| Eye on the prize |
Those balls of wool, which are just asking to be nosed, and mouthed, and toothed, and loved to death, or at least destruction. You can then pick one up in your mouth and make your way back to the floor and make an unholy mess of all that yarn.
 |
| Teeth in the prize |
 |
| Hard to couch this |

Subscribe to:
Posts (Atom)