Wednesday, July 22, 2015

Wednesday words

Failure is often seen as a disgrace in our culture, but if we watch children trying and failing and trying again as they master their milestones, we realize that each failure teaches us how to be better, stronger, more competent.

This article is an interesting examination of the link between creativity and risk taking, and its accompanying failure. The author shows how the most creative people not only fail, they fail often. Creative fails are stepping stones. There may be people who design a quilt, or a painting, or any other creative endeavor, and then follow the project through to completion exactly per the design. For me the design is more of a guideline than a rule, to quote pirate captain Barbossa. Often the elements I like best when the project is finished are the creative leaps I had to take in response to failures in the original design, or failures in my ability to execute the design. 

I guess for me failure is only failure when it is accepted as the end result, and not part of the creative process, maybe even a very necessary part of the creative process. 

I'd love to hear your thoughts!


Sunday, July 19, 2015

Fabric flower success! Part two

With fused petals in hand, florist's wire stem bent and ready to go, we can move on to the stamen and construction of the fabric flower. 

To make the stamen you will need a large button with at least 2 holes, 28 gauge wire (try the beading section of a craft store) and assorted beads with holes big enough to fit on the wire, and one crimp bead. You should have one "accent" bead for the tip of each stamen. You will also need two pieces of felt slightly bigger than the bent top of the florist's wire.


Supplies to make stamen for fabric flower
Cut a 25 inch length of the 28 gauge wire. How much you use will depend on how big a stamen you want. Poke the wire through each of the two holes in the button from the back. Pull the wire through so that on the right side of the button you have 1/3 of the wire coming through one hole and 2/3 of the wire coming through the other hole. Begin with the shorter side of the wire. Select a big bead to begin. You want one bigger than the size of the button hole so that your stamen can't get pulled to the back of the button. Add beads until you have a length of wire beaded to the height you want the stamen to be. Add the accent bead and bead the other half of the stamen. Take the wire back through the big bead and then through the button hole to the back of the button and hold or tape the end.
Return to the longer piece of wire. Complete as the first side and take the wire back to the back of the button. To make the third part of the stamen you will use the same longer piece of wire you have just created the second prong of the stamen with, but take it back to the front of the button through the first hole, not the one you just exited from. If your button has more than two holes, you can use a new hole, and you will need another big bead to begin. If there are two holes to your button you will probably not have space for another big bead, but you probably won't need it, as the stamen prong you already created will block the hole somewhat.
Completed stamen
Try making one of the stamen prongs bigger than the others to add interest, and vary the colors of the beads so they are not an exact match for the colors in your petals.

At the back of the button take the two wire tails through a crimp bead and secure. Push the crimp bead to the side of the hole, so it can't get sucked back to the right side of the button when you begin assembling the flower. 
Securing the stamen
Now you need 3 "trash" beads to act as spacers between the petals. These will not show. Find a needle that will easily fit through the spacer bead holes, and some thread that will match your felt. 


Cut two pieces of felt slightly bigger than the florist's wire circle you made. Now find something to act as a stopper on the unbent end of the wire. This is important as sewing this bit is unwieldly and you may have the wire waving about in front of your face. I use a silicone plug made for securing quilting pins, but you could even use a piece of apple, just something to cover that sharp end. 

Now sew the wire to the felt. In theory you could probably glue it with a hot glue gun, but glue and I don't get along well, so I haven't tried that.
Now make a small snip in the center of the second piece of felt, remove your safety plug and slide the second piece of felt up the florist's wire. Reattach the safety plug. Sew the edges of the two pieces of felt together so the wire is concealed between them.

Set the felt aside and back to the flower. Take the smallest petal and make a back stitch on the back with the needle and thread. Place the stamen on the right side of the smallest petal. From the back of the flower, take the needle through the hole in the button, and back down through the other hole, as though you were sewing on a button. Be careful not to take the needle through any of the beads. Make about 5 passes through the button to secure the stamen to the first petal. 

With the needle at the back of the petal take another back stitch. Attach the spacer bead. 
Now take the needle through the next petal, take a back stitch, then attach the spacer bead, and repeat until you are at the back of the biggest petal. Take a back stitch. 
Now for the slightly awkward part. Those of you who are capable of using glue and actually attaching only the things you were intending to attach might want to use glue at this point. Otherwise, take your florist's wire, and the petal, and sew the felt on to the bottom of the flower, being careful not to sew through more than the bottom petal. Make sure the safety plug is on the bottom of the florist's wire.
 
You can see that I made especially large stitches in some places so you could see them. Yes, that's what happened...

Ready?? 'Cause this is the fun part! Flip your flower over and bend those flexible petals to whatever shape your heart desires. Don't like it? Unbend and rebend. Your flower will stand proud on the wire and be very stable. You can also bend the florist's wire to fit into a vase. If you were feeling wild, you could also find some funky chenille sticks to wind around the florist's wire if you want the flower to protrude out of the vase.
Flexible fabric flower

Ta da!
Fabric flower Ta-Da!

Now you can make a vase full!


Flexible fabric flower arrangement
If the petals seem too much work, or for some contrast, you could experiment with just one base fabric petal and use the wire and beads to create the interest. The possibilities are endless!
Beaded flowers

Tuesday, July 14, 2015

Fabric flower - success - part 1!

My father smoked a pipe. Before they were called fancy "chenille sticks", bendable, flexible, light, cheap pipe-cleaners were used through the ages to clean pipes. They were also purloined through the ages to make stick figure dolls because they are wired. The wire is buried in a soft coating, so it will not poke through fabric flower circles, but petals containing pipe cleaners can be made to drape! Eureka! Disclaimer: If you do not hide them, your cats will also go to extraordinary lengths to steal them.They contain wire. Do not let your cats steal them!

How to get the chenille stick into the flowers? I could sew a channel, but that is fiddly work. I could fuse it between the circles so the circles are finished off at the same time? Two-fer. Love it. Off to find drinking glasses, and other kitchen objects to make cardboard templates. All those cardboard flyers you get in the mail? Keep them for craft projects.


So, layers of petals from small to large, my flower is taking shape. Silk is best to use for maximum drape, but since I want to use some cotton, I am going to use MistyFuse instead of WonderUnder, for a softer fused fabric.
Chenille sticks for bendability


I have cut two petals of the same size for each layer. 4 layers I think should do it. If the chenille stick is at least a centimeter, or finger width, from the edge, I can fuse the edge firmly.  For the biggest petals, some funky bending will give me more flex. The circles are fused with the chenille stick as the sandwich filling. The edges don't match exactly, what a surprise...but I intend to trim them once the fusing is done, so no problem there. Frieda Anderson has some good fusing tips here. Read them if you haven't fused before. The potential for a sticky mess definitely exists, and it is more fun to make flowers than clean an iron. Trust me on this...

Once the fused petal has cooled, I can trim each side until no fusible is visible, then time for a last hard ironing to seal that edge firmly. The chenille stick has made a shiny mark on the biggest petal, but it is going to be bent, and partially covered by the next petal, so no worries there. I am not a perfectionist, can you tell?

Now to make the stems. 18 gauge florist's wire is a good weight. A simple wooden craft clothes pin saves my fingers and wrist. With the end of the wire in the slit in the clothes pin, a simple turn of the clothes pin gives me a nice spiral with the stalk of the wire near the center. This will make a support for the flower, so it doesn't flop.
Clothespin to the rescue of sore fingers


Wire support for fabric flower

The components are coming together nicely!

Next challenge, will be to separate the petals. I think beads will make good spacers. Then I need a focal point. Wired bead stamens will be fun, and I can pull in the fabric colors. If I use a large button, I can attach the stamen through the top of the button, and work down to the last, biggest layer. This allows me to camouflage all the messy ending bits and attach the stem at the same time! I have a plan! Now I need some coffee!

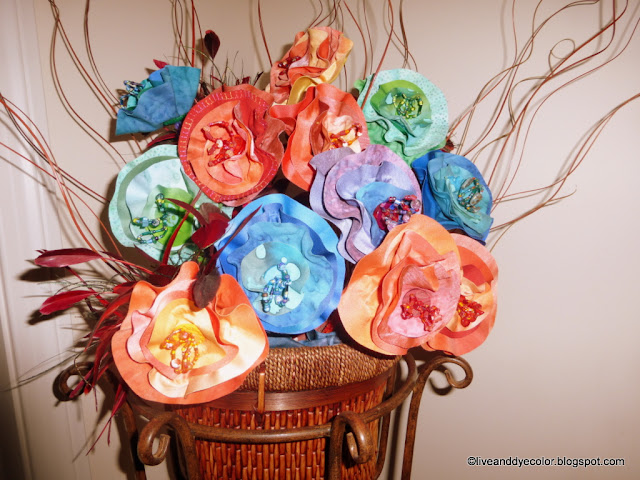
Next post will show how to put all the bits together to make something like this.


Fabric flower with drape and dimensionality


Monday, July 13, 2015

Fabric flower fail part 2

If 2D flowers were not going to work, then off to Pinterest and the web again to look for 3D flowers.
Classic Felt Flowers from Thecraftyblogstalker

Good grief no! These were waaaaaaaay too much work. I am spatially challenged. You will lose me at "Take the first strand over the second strand". You mean the one I just dropped and the cat has made off with?? The 3D ones I found were also striving for realism, not my style. I wanted petals that draped, I wanted petals in layers, and I wanted the whole thing to sit in a vase like a flower, but I didn't want it to pretend to BE a flower, at least not without a very large wink to the viewer.

I found flowers that were circles of fabric, layered, with a button or bead in the middle. I cut circles of fabric. I looked at circles of fabric. They remained flat circles. I pondered. I asked at JoAnns about moldable interfacing. They looked blank. I googled all possible variations and discovered products I did not know existed, mainly for hats and caps. None of them seemed like what I was looking for though. Too stiff, too bulky, too expensive, too hard to find. Did I mention I'm picky?